White Labelling in Timetics AI
White Labelling lets you customize the customer-facing booking experience with your own brand. Your customers can see your domain, brand name, logo, favicon, colors, booking page design, and legal links instead of Timetics branding.
Your booking customers never have to see Timetics. However, the people who log in to manage the calendar will see the Timetics dashboard.
Everything on the public, customer-facing side — including the booking page, booking emails, and domain — can be made fully yours. The admin dashboard, login screen, and account/invitation emails remain Timetics-branded and are not white-labelled today.
Follow the video tutorial for the complete White Labelling process.
How to Configure White Labelling
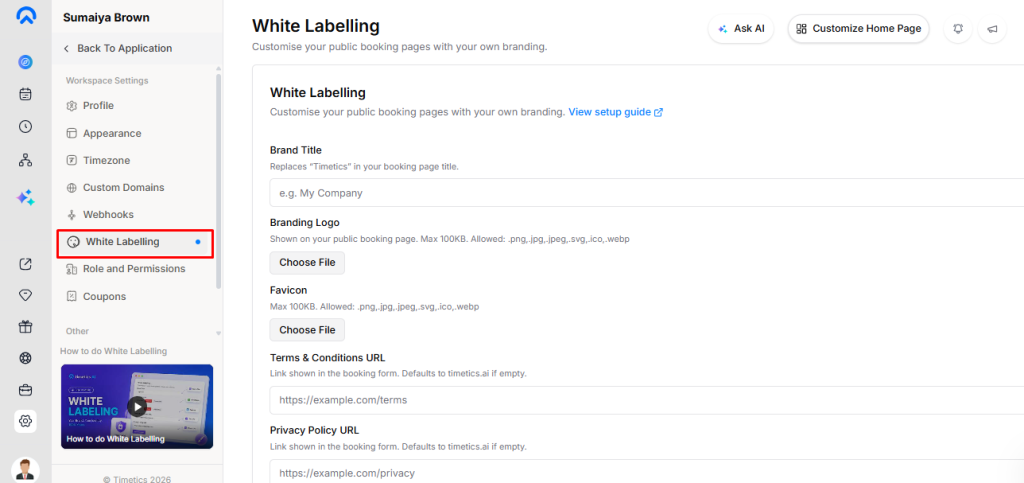
- Go to Settings and open the White Labeling section.
- Enter your Brand Title to replace the Timetics AI name in the browser tab.
- Upload your Logo to replace the default platform logo throughout the booking experience.
- Upload a Favicon to replace the default browser icon.
- Add your own Terms and Conditions URL and Privacy Policy URL.
- Configure the available branding options such as Brand Colour, Custom Domain, Hide “Powered by Timetics”, and Booking Page Builder.
- Click Save Changes to apply your branding.
What You Get with White Labelling in Timetics AI
1) Booking Page
The booking page can be customized with your own branding and customer-facing details.
- Custom Domain: Run your booking page on your own domain, such as
book.yourclinic.com, instead of a Timetics URL. Add the domain in Settings, point a CNAME, and SSL is provisioned automatically. - Brand Title: Replace the word “Timetics” in the booking page title and browser tab with your own brand name.
- Branding Logo: Add your own logo to the public booking page. The maximum file size is 100 KB.
- Favicon: Add your own icon to the browser tab. The maximum file size is 100 KB.
- Brand Colour: Set the accent colour for your booking page.
- Hide “Powered by Timetics”: Remove the Timetics badge from the booking page entirely.
- Terms & Privacy URLs: Add your own legal links to the booking form. If these fields are left empty, they fall back to
timetics.ai. - Booking Page Builder: Build your own booking page layout and theme.
2) Emails Sent to Booking Customers
Custom SMTP allows you to connect your own SMTP server so booking emails are sent from your domain and sender name.
Once your SMTP is connected, it can be used for:
- Booking confirmation
- Booking reminder
- Booking cancellation for the customer and owner
- Reschedule request and reschedule confirmation
- Payment received and payment reminder
- Workflow automation emails
3) SMS
Custom SMS allows you to send booking SMS through your own SMS provider or sender ID.
What Is Not White-Labelled In Timetics AI?
1) Login and Admin Dashboard
Whoever manages the calendar — your client, their receptionist, or their therapists — logs in to the Timetics app and sees the Timetics dashboard.
The Custom Domain applies to the public booking page only, not to the login screen or the back office.
2) Invitation Emails
When you invite someone into a workspace, the invitation email is sent by Timetics, carries Timetics branding, and links to the Timetics app.
It cannot be sent from your own domain or under your own brand.
Workaround for agencies: Instead of sending an invite, create the client’s account yourself from your agency dashboard. Set their name, email, password, and workspace, then hand over the login credentials directly.
The account is created already verified, so your client never needs to act on a Timetics email.
3) Account Emails
Verification and password reset emails always go through Timetics’ own mail system, never your SMTP, and remain Timetics-branded.
4) Links Inside Booking Emails
The cancellation and reschedule email templates still contain a “contact support” link pointing to timetics.ai/support, even when the email is sent from your own SMTP.
The confirmation, reminder, and payment emails do not contain this link.
Which Plan Do You Need?
The following are paid features and must be enabled on the workspace’s plan:
- Custom Domain
- Custom Branding — hide “Powered by Timetics”
- White Labelling — brand title, logo, favicon, and legal links
- SMTP Email
- Custom SMS
- Booking Page Builder
If a workspace is on a plan without the required feature, saving that setting is rejected.
Note: Brand colour and other appearance settings can still be saved on any plan. Only turning off the Timetics badge requires Custom Branding.
For Agencies Reselling Timetics AI
A realistic way to describe it to your own clients:
“The booking experience your patients see is entirely your brand — your domain, your logo, your emails. The scheduling back office you’ll log into is a platform called Timetics, which we manage and support for you.”
If fully white-labelled admin access is a hard requirement for your positioning, Timetics does not support it today.
Frequently Asked Questions
Q1: What is White Labelling in Timetics AI?
A1: White Labelling lets you customize the customer-facing booking experience with your own brand, including your domain, brand name, logo, favicon, colors, booking page, and legal links.
Q2: Can I use my own domain for the booking page?
A2: Yes. You can connect a custom domain such as book.yourclinic.com to your public booking page. The custom domain does not apply to the Timetics login or admin dashboard.
Q3: Can I remove the “Powered by Timetics” badge?
A3: Yes. The Hide “Powered by Timetics” option removes the Timetics badge from the public booking page. This requires the Custom Branding feature.
Q4: Can I add my own logo and favicon?
A4: Yes. You can upload your own logo and favicon from the White Labeling settings. Each file can be up to 100 KB.
Q5: Can I send booking emails from my own domain?
A5: Yes. By connecting Custom SMTP, booking emails can be sent using your own domain and sender name. However, account and invitation emails remain Timetics-branded.
Q6: Are the Timetics login and admin dashboard white-labelled?
A6: No. The login screen and admin dashboard remain Timetics-branded. Custom Domain applies only to the public booking page.
Q7: Are invitation and account emails white-labelled?
A7: No. Workspace invitation, email verification, and password reset emails are sent through Timetics’ own mail system and remain Timetics-branded.
Q8: Can I customize the legal links on my booking page?
A8: Yes. You can add your own Terms and Conditions URL and Privacy Policy URL. If these fields are empty, they fall back to timetics.ai.
Q9: Which White Labelling features require a paid plan?
A9: Custom Domain, Custom Branding, White Labelling, SMTP Email, Custom SMS, and Booking Page Builder are paid features and must be enabled on the workspace’s plan.
Q10: Can agencies fully white-label Timetics for their clients?
A10: No. Agencies can fully brand the customer-facing booking experience, but the login and admin dashboard remain Timetics-branded. Timetics does not currently support fully white-labelled admin access.