What is a Workspace?
A Workspace is a dedicated environment where you can manage your calendars, bookings, team members, and other scheduling settings.
Instead of managing everything in one shared environment, you can use separate workspaces for different businesses, teams, or projects.
What is a Workspace in Timetics AI?
In Timetics AI, a Workspace provides a separate environment for managing your scheduling and appointment operations.
Depending on your setup, a workspace can include:
- Calendars and Services: Manage different appointment types and booking schedules.
- Team Members: Add and manage team members within the workspace.
- Bookings: Keep bookings organized within the appropriate workspace.
- Integrations: Configure the integrations required for that workspace.
- Branding and Booking Settings: Manage workspace-specific booking and appearance settings.
You can switch between available workspaces from your Timetics AI account without needing separate logins.
Why Use Workspaces in Timetics AI?
Workspaces make it easier to manage multiple scheduling environments while keeping each setup organized.
- Keep Data Organized: Manage bookings, calendars, team members, and settings separately for each business or project.
- Manage Multiple Businesses: Run scheduling operations for multiple businesses from one Timetics AI account.
- Separate Team Access: Invite team members to specific workspaces and manage their permissions accordingly.
- Simplify Management: Switch between workspaces without logging out of your main Timetics AI account.
Key Use Cases
1. Managing Multiple Businesses
If you manage multiple businesses or brands, you can use separate workspaces to keep their scheduling operations independent.
For example, you can create different workspaces for:
- A consulting business
- A training company
- A service-based business
Each workspace can have its own calendars, team members, and booking settings.
2. Managing Client Projects
Agencies and consultants can use separate workspaces to organize scheduling setups for different clients.
For example:
- Create a workspace for each client.
- Add the client’s team members to their workspace.
- Configure calendars and booking settings according to the client’s requirements.
- Switch between workspaces when managing different client projects.
How to Manage Your Workspaces
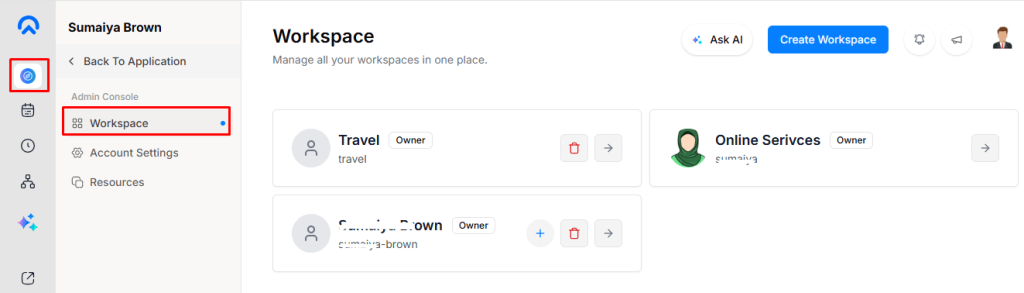
- Go to Admin Console → Workspace to view your workspaces.
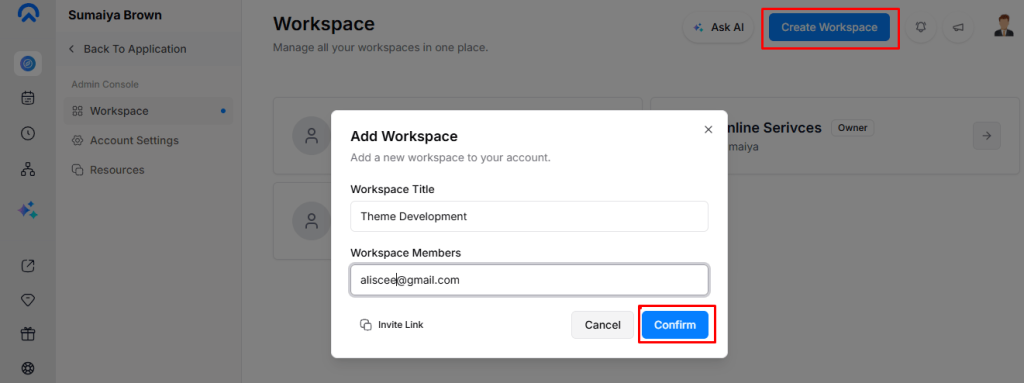
- Click Create Workspace, enter a Workspace Title (up to 100 characters), optionally add member email addresses, and click Confirm.
- New workspaces start on the Free plan with default availability, and invited members receive the Member role.
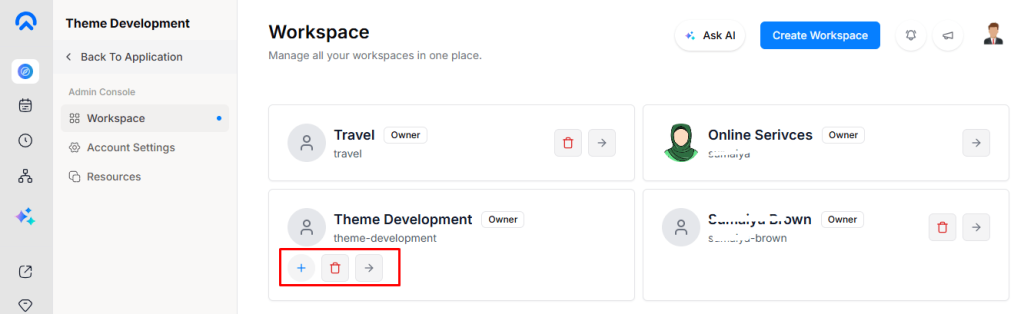
- Click Switch on a workspace card to make it active.
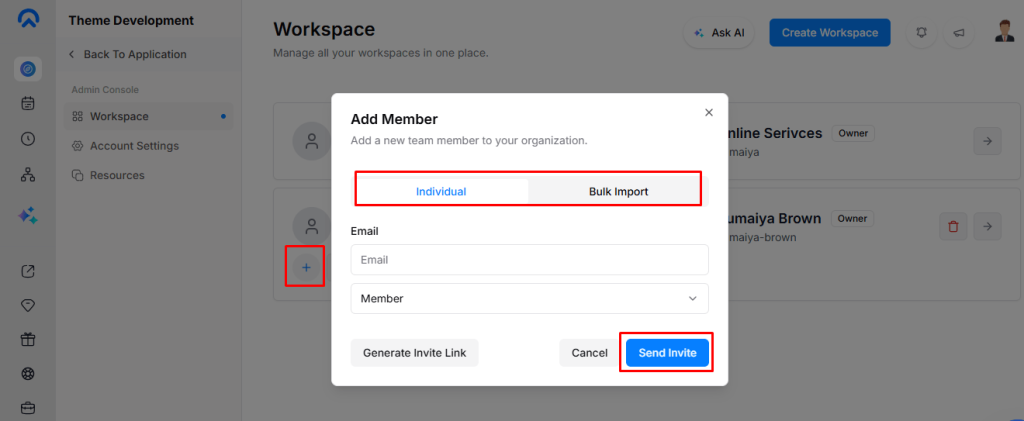
- Use the Plus (+) button to invite members to the current workspace.
- Click Delete to remove a workspace you own, except your primary workspace.
Workspace Handle
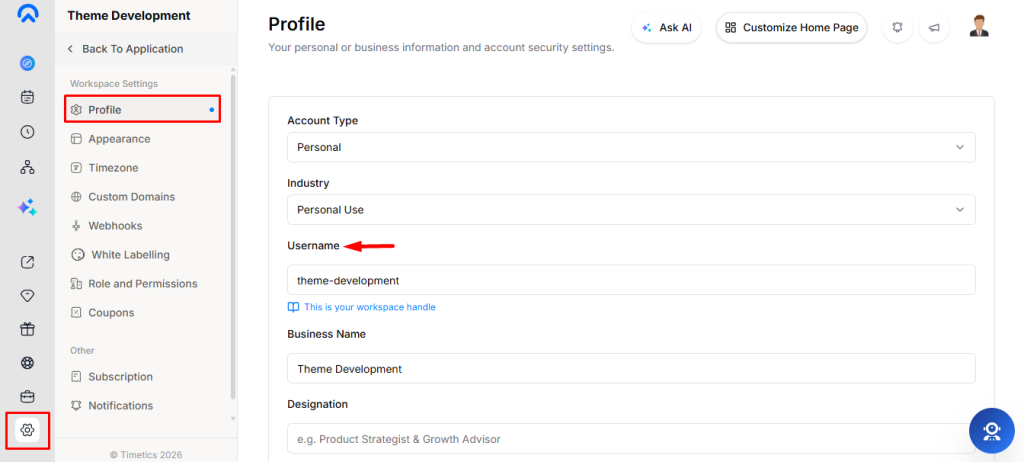
Timetics AI automatically creates a public handle from the workspace name. For example, Learn and Earn becomes learn-and-earn. If the handle already exists, a number is added.
You can change the handle later from Settings → Profile.
Note: Changing the workspace handle also changes its public URLs, so previous booking links may no longer work.
Workspace Switching
Switching workspaces changes the active workspace and loads its calendars, bookings, availability, team members, integrations, branding, and settings. Each workspace operates independently.
Delete a Workspace
- Only the workspace owner can delete a workspace.
- The primary workspace cannot be deleted.
- Deleting a workspace permanently removes its calendars, bookings, and settings.
Warning: Workspace deletion is permanent and cannot be undone.
Important Notes
- Each workspace has its own subscription; paid plans do not transfer between workspaces.
- Workspace data and settings remain separate.
- Export important booking data before deleting a workspace.
Frequently Asked Questions
Q10: Can I delete my Workspace?
A10: Yes, the workspace owner can.
Q1: What is a Workspace in Timetics AI?
A1: A Workspace is a separate environment for managing calendars, bookings, team members, and scheduling settings.
Q2: Can I create multiple Workspaces?
A2: Yes, you can create separate workspaces to manage different businesses, teams, or client projects.
Q3: Can I manage multiple Workspaces from one account?
A3: Yes, you can switch between available workspaces without logging in and out of separate accounts.
Q4: Where can I view my Workspaces?
A4: Go to Admin Console → Workspace to view and manage your available workspaces.
Q5: What happens when I create a new Workspace?
A5: A new workspace starts on the Free plan with default availability. Members invited during setup receive the Member role.
Q6: Can I invite members to a Workspace?
A6: Yes, you can invite members when creating a workspace or use the Plus (+) button to invite them later.
Q7: Can I switch between Workspaces?
A7: Yes, click Switch on the workspace you want to manage to make it active.
Q8: Can I change a Workspace Handle?
A8: Yes, you can change the workspace handle from Settings → Profile.
Q9: What happens if I change my Workspace Handle?
A9: Changing the handle updates the workspace’s public URLs. Previous booking links using the old handle may no longer work.
Conclusion
Timetics AI Workspaces make it easier to manage multiple businesses, teams, and client projects from a single account. By keeping calendars, bookings, team members, and settings separated, you can maintain an organized scheduling environment for each workspace while switching between them whenever needed.